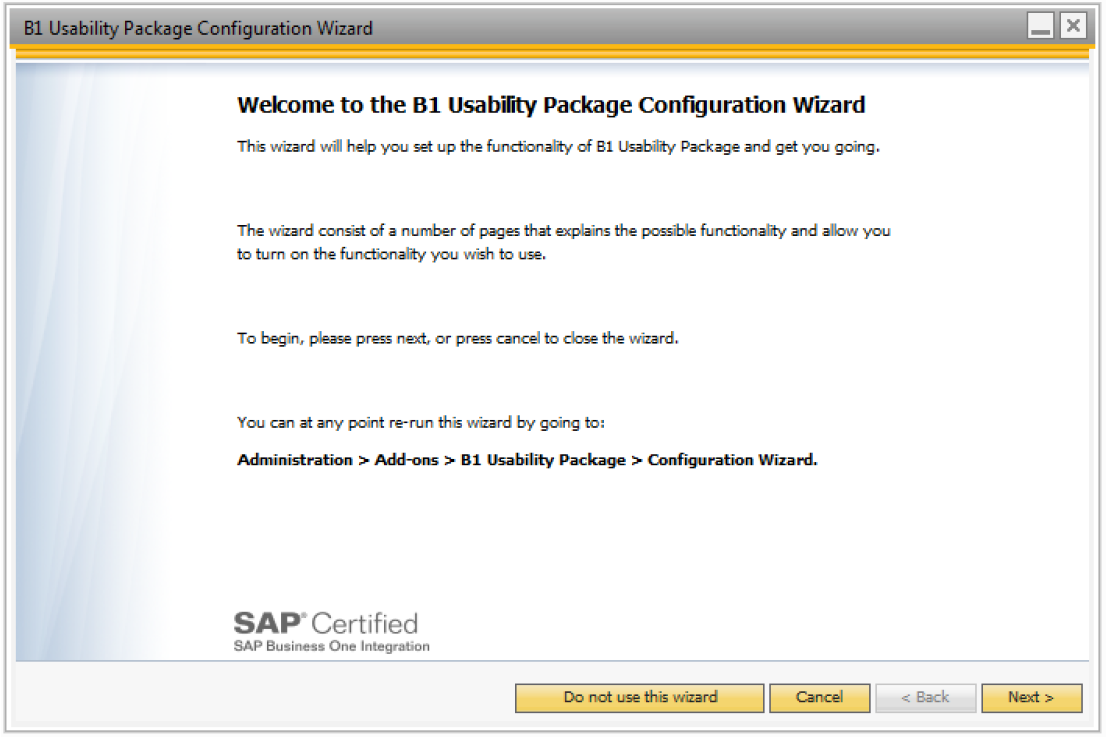
The first time the add-on starts, it will only set up the basic configuration, because it up to the user which parts of the package should be used. After setting up this configuration table you will be asked to restart. Please do so.
After restart, you will be presented to the B1 Usability Package Configuration Wizard which will guide you through the initial configuration
Wizard itself consists of 7 steps. Step 1-4 Present you the B1 Usability Package Modules.
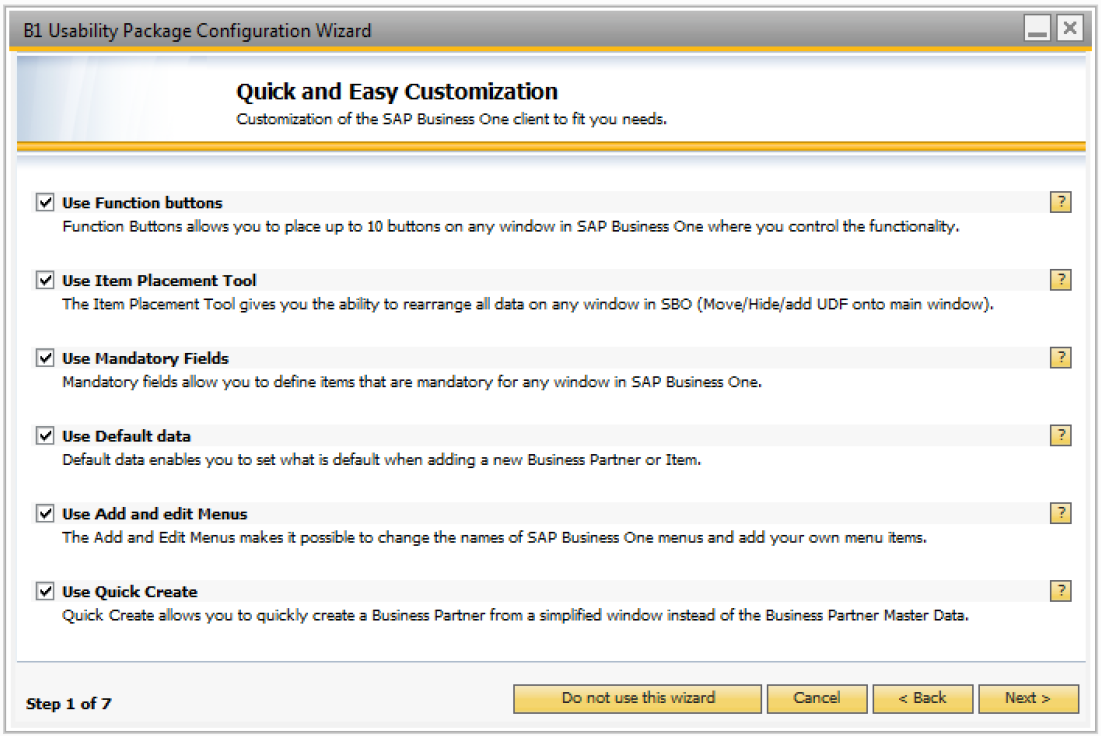
Each module has a checkbox you can check if you decide to use the module or not. Below is a small description of what the module does, and if you press the “?” button to the far right you are taken to the modules website with E-Learning and additional information.
Step 5 of the wizard contains the B1 Productivity Package Modules. These are optional modules for purchase, but if you check them during the wizard you will get a 20 day free trial period.

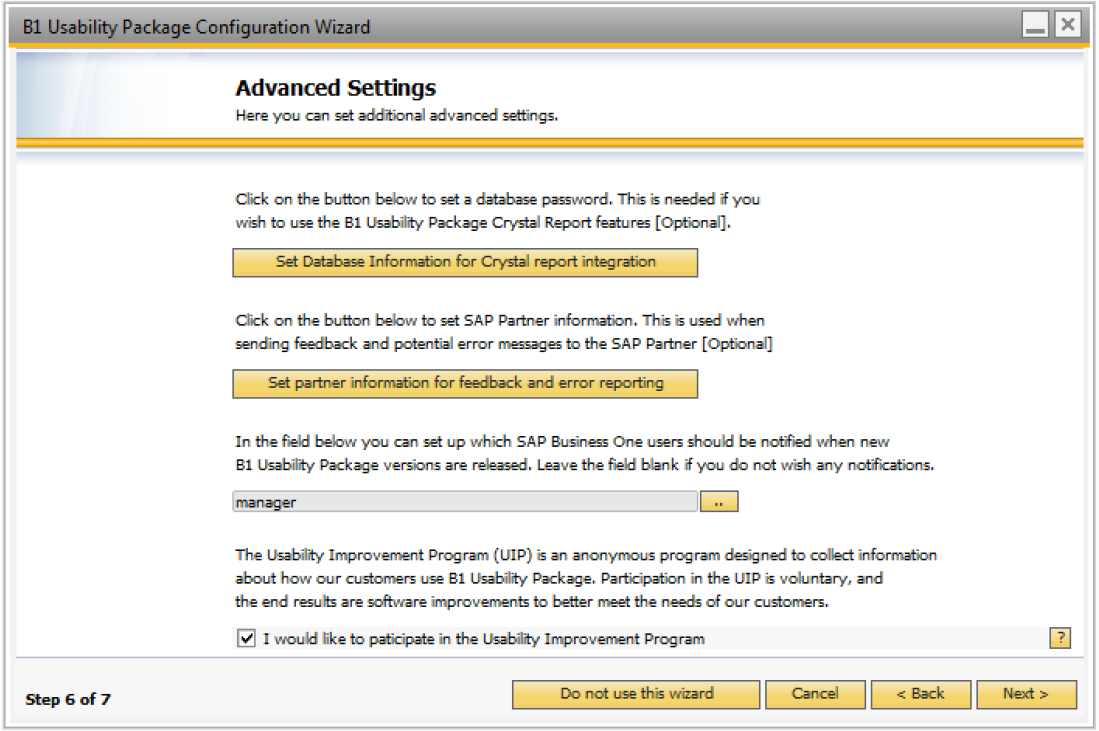
Step 6 of the wizard contains advanced settings like how to connect to the database if you wish to use the Crystal report features, partner information, update notification settings, and participation in the Usability Experience Program.
On the final page you need to press the Finish button in order to confirm your selections.

All depending on how many modules you activated and the speed of your system it can take a few minutes before all configurations are ready. You can track the progress of the wizard in the lower-left corner of the SAP Business One client.
You can at any time rerun the wizard by going to Administration > Add-ons > B1 Usability Package > Configuration Wizard. Or use the Configuration overview screen under Administration > Add-Ons > B1 Usability Package > B1 Usability Config.
B1 Usability Package tab-page
Administration > Add-Ons > B1 Usability Package > B1 Usability Config.

Each functionality is represented by a checkbox in the configuration window and checking each of them will update the configuration. Please note that the first time you check functionality, the system might need new tables and fields, and, like the basic configuration, the add-on might give a message that it needs a restart. Please note that due to the many features of this add-on, checking all functions and pressing update might take up to ten minutes the first time.
Global vs. Localization modules
Please also note that depending on localization more or less options will be available (For example the “Bank In Module” are currently only visible on a Danish localization). If no special modules are available in your localization the “Localization Modules” section will be empty.
B1 Productivity Package tab-page
Administration > Add-Ons > B1 Usability Package > B1 Productivity Config.

This tab-page contains additional optional modules that you can purchase for the Add-on. You have the option to request a 20-day demo of the functionality before you decide to purchase or not. After purchase, they work exactly the same as normal modules except that you need to manually assign licenses. See the license guide for more.
Plugins tab-page

Plugins offer additional functionality written by Boyum It A/S partners. The plugins are stored in a separate database called BOY-COMMON and are available for activation in all companies after registration
Enabling the plugin system
To use the plugin system you need to provide database credentials for a user that as a minimum have access to create databases and view databases. A user with server roles dbcreator and public should be sufficient.
NOTE: THE CREDENTIALS ARE REQUIRED AS THE PLUGIN SYSTEM CREATES A NEW DATABASE CALLED BOY-COMMON ON THE SERVER WHERE IT STORES PLUGINS AS THEY ARE NOT LIMITED TO A SINGLE COMPANY.
To enable the plugin system and provide credentials click the “Manage plugins” button in the plugin tab and you will get asked for credentials. When credentials have been supplied please re-click the “Manage plugins” button and the database and tables will get created and the plugin system will be ready for use.
Managing plugins
To manage plugin press the “Manage plugins” button, this will open a new window:

In the plugin administration window you can register, update and remove plugins.
To register a plugin press the “Register plugin” button and select a plugin to register.
NOTE: PLUGINS ARE STORED IN FILES ENDING WITH BPF (BOYUM PLUGIN FILE), TO GET PLUGINS PLEASE CONTACT YOU SAP PARTNER.
When the plugin has been added to the database you can use the administration window to assign user settings, get more information about the plugin and if required manage license information.

You can assign license information (Only some plugins require license information) by selecting a row and clicking the “Assign license button” or “Activate demo” if no license is available.
You can manage users by double-clicking in the user’s field.
To upgrade a plugin simply use the “Register Plugin” button and select the new package, the plugin will automatically get updated on the clients on the next restart.
Other options
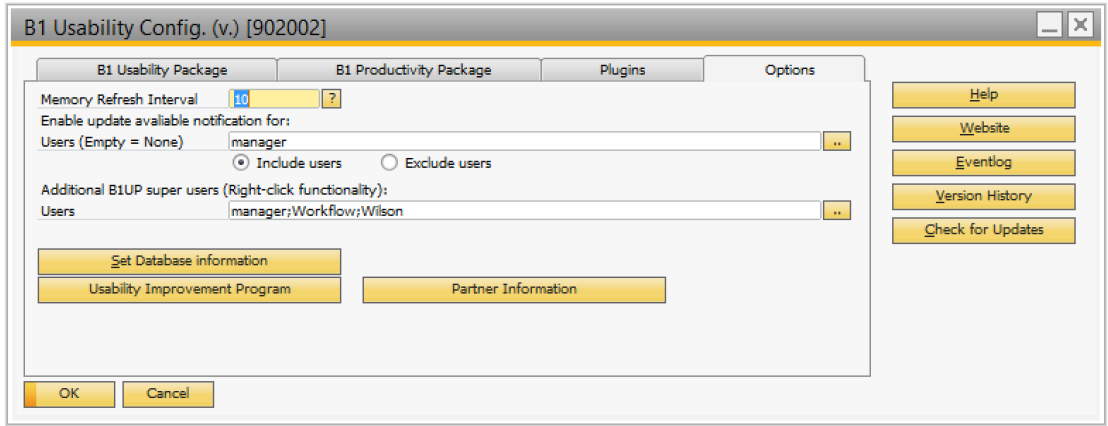
Memory Refresh Interval:
The Memory Refresh interval option on the option Tab-page defines how often (in seconds) the B1 Usability Package should optimize its memory. Normally SAP Add-ons use 100-150 MB of memory, but with Boyum ITs special memory optimization, the memory usage can be reduced to as little as 1 MB!
Using the configuration, you are able to set how often the refresh should occur. Setting a lower value will increase the reduction of memory, but might cause longer operations to be a bit slower. A higher value will make your long operations a bit faster, but the memory reduction will be higher.
Default is 10 seconds. You can turn the system off completely by setting a value of ‘0’.
If you raise the value, beware that the system might use very large amounts of memory. It is not recommended to set the value above 60.
Enable update available notification for:
You can select users using the “…” button that should be notified when a new version of B1 Usability Package is available for download. The users will be presented with a window containing a change log and the option to not get notified for the specific version again or visit our download site.
Additional B1UP super users (Right-click functionality)
You can setup additional B1UP super users that should have access to right-click functionality. SAP super users will always have access. You can select users using the “…” button.
Set Database Information
This button allows you to indicate to the B1UP External database information needed for using Crystal Reports in B1UP (Universal Functions). When pressing the button, you will see the following window.

Here you enter the database information needed.
Partner Information

Here you may set information about the partner installing the software. If an error occurs and the users press the send email button the email will be sent to the email defined in partner information.
Usability Improvement Program
NB: THIS IS AN ONLINE SERVICE THAT REQUIRE AN ACTIVE INTERNET CONNECTION. IF YOU USE PROXY YOU NEED TO SET UP THE PROXY DETAILS IN THE SAP BUSINESS ONE GENERAL SETTINGS
Here you can set if you wish to participate in the Usability Improvement Program (UIP).

You can read more about the UIP here: http://www.boyum-it.com/sbo/uip/
Eventlog
The B1 Usability Package includes its own Event-log where information and errors happening while logging the add-on is running.

Additional Authorization Tree
During the startup of the B1 Usability Package, a user permission tree is created, in order to be able to set different user permissions throughout the system. If you already have such a tree, you will still be able to use it, as the new tree doesn’t overwrite existing trees. The tree created by the B1 Usability Package will set the authorization level to full authorization for all users, for all forms in the B1 Usability Package. This will not affect an already existing tree, where user authorization might be restricted for specific forms, as no authorization overrules full authorization for a user. It is recommended not to delete the permission tree created by the B1 Usability Package, as it will be created every time it is missing.

Shared functionality
The following sections describe functionality that is shared among multiple add-ons.
Users selection
In several of the B1UP configurations you have the option to make configuration user-specific:
- Function Buttons
- Item Placement Tool
- Mandatory Fields
- B1 Validation System
- Add and Edit Menus
Below show the Function button configuration as an example but they all work basically the same.
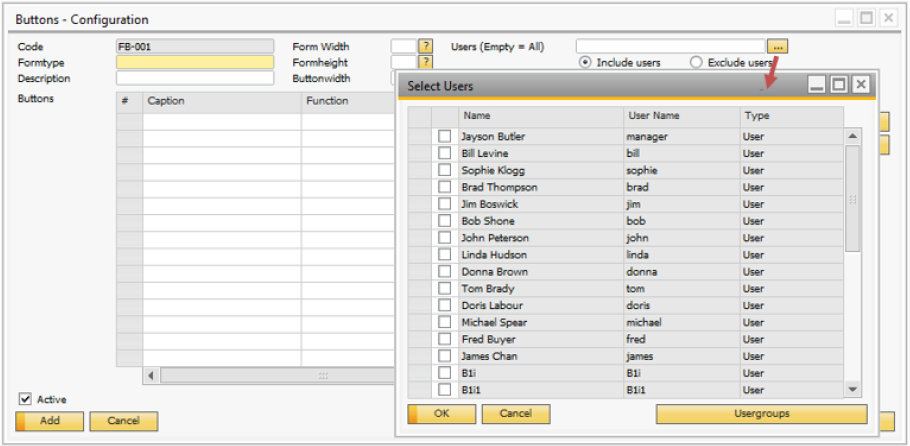
The Select Users can be accessed by either right-clicking the users-field or pressing the “…” button. The window presented will display all users in the currently logged-in database + any user groups you might have created (see below). By choosing users you can select which users to include/exclude for the configuration (Described in more detail in each configuration section).
User Groups
Selecting users as above is easy but can be tedious if you have a lot of users (and add a new user). For that reason, you have the option to group users in user groups. In order to access the user-groups press the Usergroups button on the “Select Users” window:

Here you can create user groups and assign a set of users to them. You need to provide a code and a name for the groups and select the users that should be in the group. In the sample above we have created a group called sales and added Donna, Doris, and Fred to it (Later if a new person joins sales you just need to include them in the group and they will get the same configs as the 3 mentioned users).
TIP: A USER CAN BE PART OF MULTIPLE GROUPS IF NEEDED
Now when you return to the Select Users window you will see the created user groups as well as individual users and you can select them as to where they are users.

In our sample, we have in essence selected manager (as a user) and Donna, Doris, and Fred (as a group). Should any of these 4 users log in they will see the respective configuration.
Export
In order to reuse, and work in multiple databases most of the B1UP configurations have export and import features to XML. This section will explain the Export features.
You generally have two options to export data. Either one configuration at the time or as a batch of multiple configurations.


Import
In order to reuse, and work in multiple databases most of the B1UP configurations have export and import features to XML. This section will explain the Import features.
As with import, you have two options; you can either import one config at the time or a batch of multiple configurations.

| Type | Description |
|---|---|
| One | This will import a single XML file selected via an open file dialog. Once you select your stored XML (from a previous export) you will be presented with the data from the file in add-mode. Review the configuration and Add the configuration to confirm the import. |
| Multiple |
If you choose Multiple you will be presented with the following import window. Once opened the choose folder dialog will appear where you need to choose where to store the configuration files. (You can change your choice later by pressing the “…” button in the upper right corner). The import will now scan the selected folder for XML files that fit the import type (Example: only XML in a folder that are Function button configurations will be presented in the Import of function buttons.) Some configurations are dependent on other configurations (Universal Functions etc.) and if a scanned configuration are validated to not have its requirements the system will by default uncheck if for include (Check the remarks for reason), but you have the option to override it. Now simply check/uncheck the configurations to include and press import. The result of the import is a set of configurations imported into the database. NB: THE UNIVERSAL FUNCTION IMPORT FEATURE ALSO INCLUDE THE OPTION TO ASSIGN A NEW UF-CODE TO THE IMPORTED CONFIGURATION SHOULD THE CONFIGURATION ABOUT TO BE IMPORTED HAVE A CODE ALREADY USE IN THE DATABASE. WARNING: AN IMPORT ONYLY CONTAINS THE RAW CONFIURATION. IF THE CONFIGURATION REQUIRES OTHER CONFIGURATION LIKE UNIVERSAL FUCNTION, UDFS, UDTS, FORMATTED SEARCH ETC. YOU NEED TO MANUALLY SET THESE UP. |

.NET Snippet
The .NET Snippet system allows you to create new keywords that can be used in B1 Validation System and Universal Function – Macro. The keywords can be made using either C# or VB and it gives you the full power of the SAP SDK. This gives you the option to create advanced C#/VB code that you can then expose as a simple keyword.
The .NET Snippet is useful in cases where you need to access something very specific that B1UP does not expose by default.
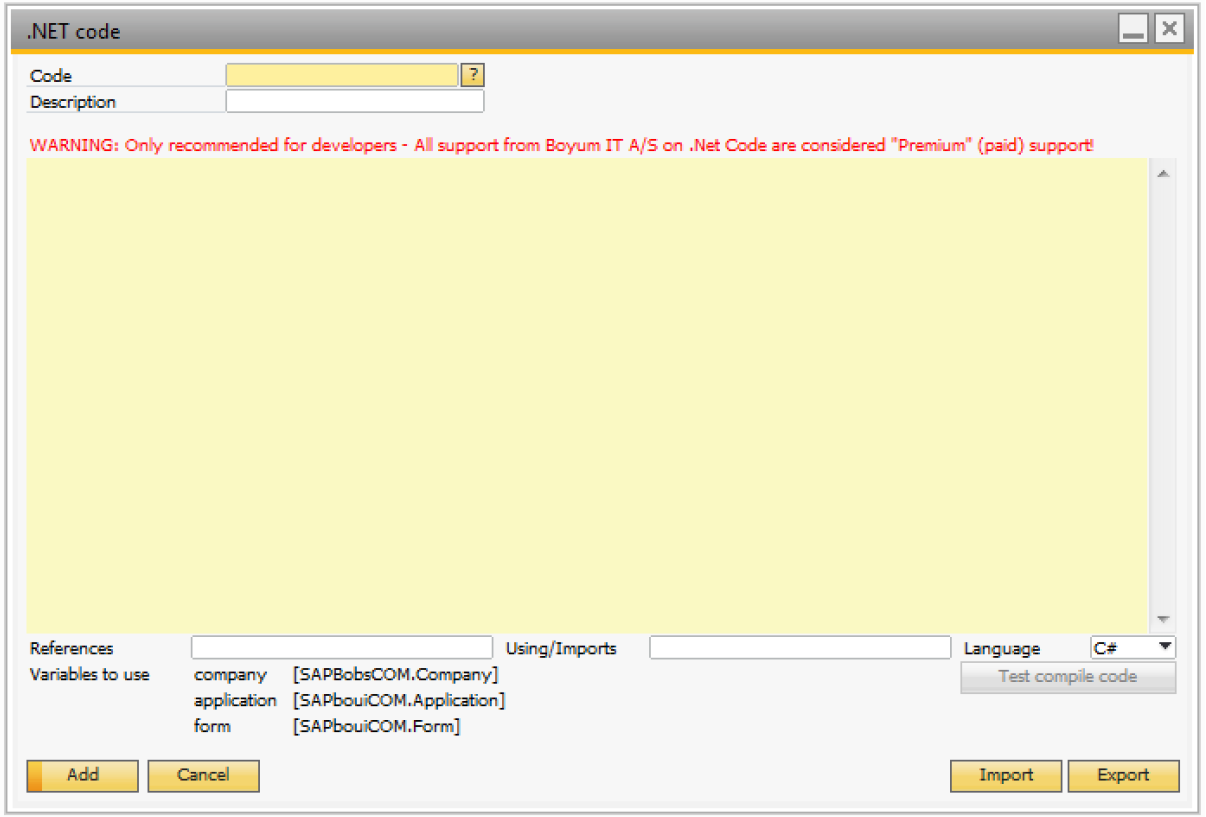
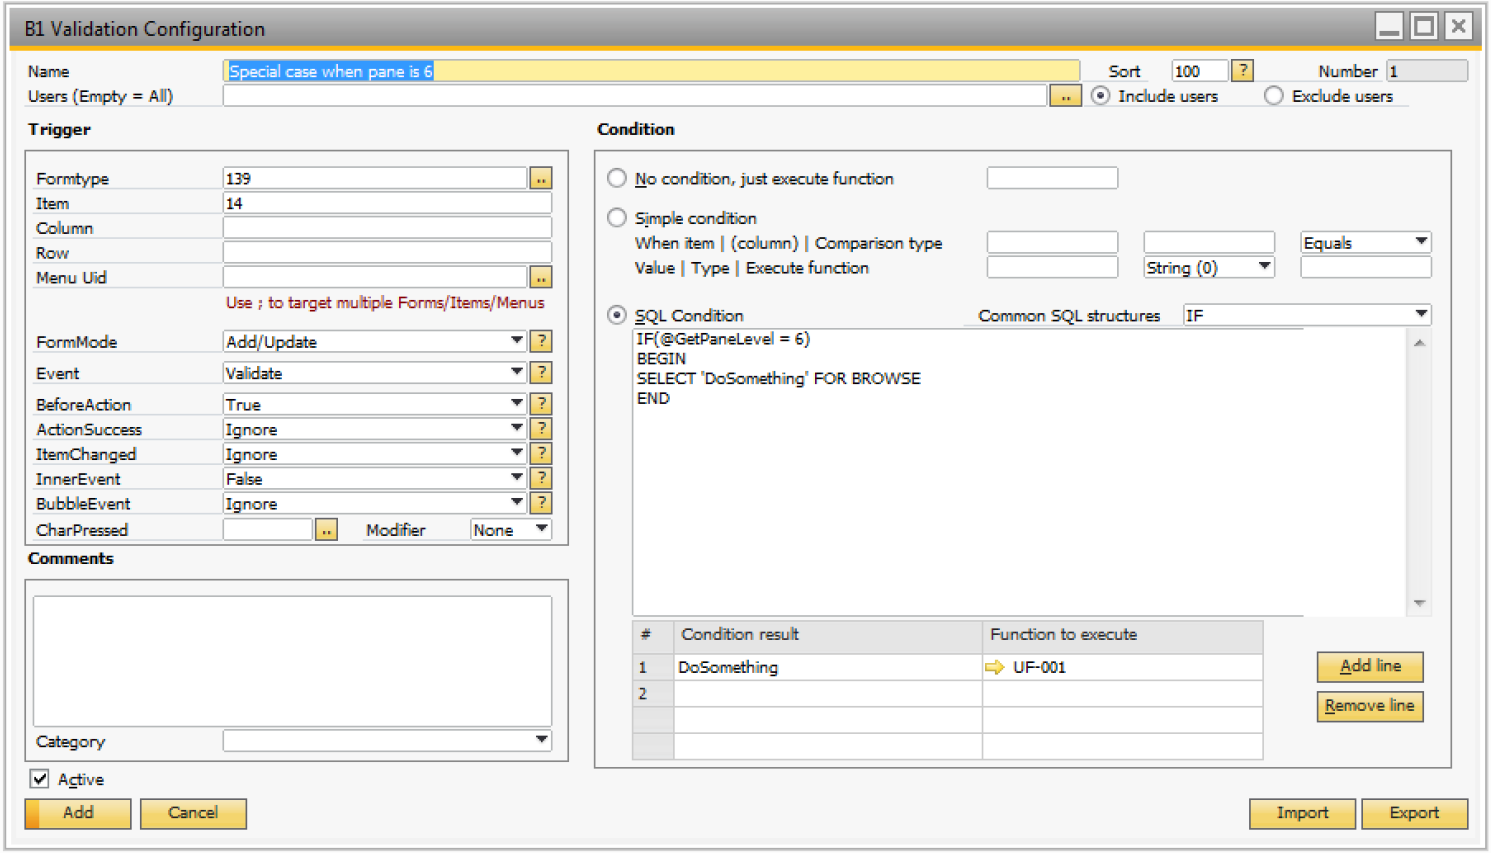
For example, if you only want to run a B1 Validation when you are on a specific pane on the form. To access the .NET Snippet you can right-click the SQL field on the B1 Validation System or the Macro Field in Universal Function – Macro.

This will open the window:
| Field | Description | ||||||||
|---|---|---|---|---|---|---|---|---|---|
| Code | Each configuration will need a unique code. The code is also what will be used as a Keyword. This means that if you call the keyword GetPaneLevel you can access it later as @GetPaneLevel. | ||||||||
| Description | You can give it a description if needed. | ||||||||
| Code textarea |
The code field allows you to write .NET code (Either C# or VB.NET) and have it executed when the Universal function is called. As this is a keyword system you are expected to return a string. RETURN ”MY COOL KEYWORD”; From the code you have access to 3 variables:
TIP: IF YOU HAVE SO MUCH CODE THAT IT CAN’T BE IN THE TEXT-AREA YOU CAN WRITE: CODEFROMFILE(<PATH TO CODE-FILE>) THIS WILL RESULT THAT THE RAW DATA IN THE FILE WILL BE LOADED AS THE CODE TO EXECUTE. |
||||||||
| References | In this field you have the option to add dll-references to the code. As default the following references are already included: - System.dll
|
To create the sample where it returns the PaneLevel of the form you can write a bit of C# as below:

You can then use the keyword in either the B1 Validation System or the Universal Function – Macro:
Configuration categories
The configuration categories system comes with two features. First it allows you to add B1UP configurations to categories allowing you to get a better overview of what B1UP configurations belongs to what features. This is useful when you have many configurations and have a hard time keeping track of what features each category is a part of. Secondly the system allows you to right click any window and get a list of all configurations on the window.
First let’s have a look at the configuration categories. The configuration window can be accessed from Administration->Add-Ons->B1 Usability Package->Module Configuration->Configuration categories.

| Field | Description |
|---|---|
| Code | You need to give the configuration a unique code. |
| Name | The name of the configuration that will be shown in comboboxes in other B1UP configuration windows. |
| Description | A description of what this category contains. |
| Overview | Will open the overview form that shows all configurations added to this category. |
After creating a category you are now able to add configurations to this category. You can find the category combobox on most windows in B1UP and if a window has lines you can also find it on line level. Example: B1 Validation:
Comments
0 comments
Please sign in to leave a comment.